Searching for your first job is a full-time job in Australia. You need to find relevant jobs, tailor your resume and cover letter to match the job description, apply and follow up. You need to repeat this for literally hundreds of jobs before you succeed.
As you can see it is a tedious process and clearly you need some sort of system to keep track of your job applications. In this article, I am going to show you how Trello can help you manage each stage of your job search process.
Why Do You Need To Manage Job Search?
Given how tough it is to penetrate the Australian job market and get the first job, I went on a job application spree when I arrived in Australia.
Like everyone else, I applied to any job which matched even 50% of my skills. That included jobs from Sydney, Melbourne, Perth, Brisbane or almost all over Australia even though I was residing at Melbourne. As you can imagine, things quickly went out of control.
Soon I lost track of jobs I had applied to. The only way I had to keep track was my email account.
As I gained more understanding of the Australian job market, I came to know that each resume should be tailored to match the job description. This resulted in many different versions of my resume and cover letter. I had no idea which version was used against which job.
Then one day I received a call from a recruiter. Her first question was – why I thought I was a good fit for that job?
That was my “oh s**t!” moment as I didn’t remember what the job description was. Panicked and sweating profusely, I gave a generic reply explaining my career background to scrape through somehow. Needless to say, I didn’t hear back from her.
But that incident underlined the inherent problem – I needed a system to manage my job applications. The way Guy Pearce needed a system to organise his memories in Memento.
Video Tutorial
Here is a video to show you how you can manage job applications with Trello. If you prefer to read, please continue ahead.
First Attempt At Job Search Management
To begin, I devised a simple system.
I created a folder on my computer – “Jobs Applied” – which was synced to my Dropbox account. It was divided into folders for each month.
For each job application, I created a sub-folder under it with a naming convention. The convention was – {day applied}_{broad skillset}_{company name}_{job portal}_{location}. So if I applied for a job of .Net developer for ABC company at their Brisbane location through Seek.com on 1st of July, I would create a folder 01_NetDev_ABC_Seek_Brisbane under July folder.
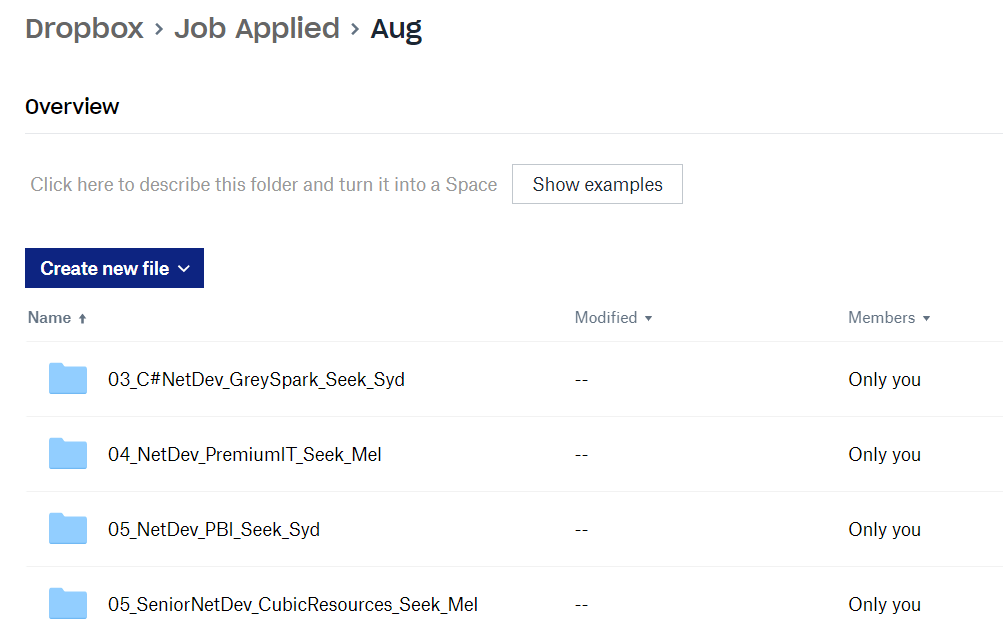
Inside the folder, I created a word file containing the job description and a link to the original job description. Also, I placed the customized resume and cover letter in this folder. This was surely an improvement. Now if recruiter called, I can just go through the folders to look for a specific job, open the job description, open job-specific resume and answer recruiter questions. Yee-haw!
However, soon the problems of this system became apparent.
First of all, I had no easy way to keep track of the progress of my job application. For example, when my application went from “Applied” to “Scheduled For Interview” stage, I had to either change the folder name to reflect this, add a note inside the folder or add a parent level folder “Scheduled For Interview” and move all the jobs to it. None of it was efficient as I was applying for about 10 jobs each day.
Another problem was keeping track of interviews. Let’s say that I had interviews scheduled for 4 jobs – two interviews on Monday, 3rd one on Wednesday and 4th interview on Thursday. How could I reflect this in the folder system? Sure, I can add a note in the folder but like above it is not easy to go through myriads of folders to find the ones you are interested in. That means I have to manually create appointments in my calendar.
Another issue was tracking follow-ups. When you apply for a job, following up on your application is a crucial part of the process. But if you apply for 10 jobs-a-day, how do you know which jobs need to be followed up and when? Also, in order to follow up, I had to go through the job description and find out who the contact person was. Also, if you need to follow up multiple times, you need to remember when you followed up last and what was the response.
As I soon understood, managing job applications using the file system was not an ideal solution. Then came the “lightbulb moment” when I caught sight of Trello.
What Is Trello?
You might have known Trello as a task management system, mostly used for project management work. However, the simplicity of Trello’s user interface makes it incredibly useful to keep track of job applications too.
To use Trello, first of all, you need to create a free account with Trello. To create an account, you simply need to provide name, email address and password. Once you have the account, you can log in to Trello.
Before using Trello, here are a few key things which you need to understand.
In Trello, everything is grouped as a board. A board represents a project or a set of relevant tasks. For example, let’s say you want to keep track of new year resolutions, you can create a board for each year.
Inside the board, you can create lists. A list represents one step in the overall progress of the task. In our New Year Resolutions example, you can create three lists – To-Do, In-Progress, Completed. Initially, all resolutions will sit under To-Do list and they can be moved to another list when required.
A “List” can contain one or more cards. A card is nothing but an activity, goal or task that you want to keep track of. In the case of New Year Resolutions example, each resolution will be a card.
Great! Now that you know the basics of Trello, let’s see how we can use it to manage job applications.
How To Keep Track of Job Applications With Trello
Since I was applying for jobs in multiple cities, creating one board per city seemed like a logical grouping. However, you can also create job boards by let’s say technology, industry, job type i.e. casual/contract/full-time or even a job source such as Seek/LinkedIn/Indeed etc.

Inside the job board, I created four lists to map five stages of the job search process – Applied, Follow-Up, Scheduled For Interview, Rejected and Selected. You can go crazy with this by adding many more lists like Scheduled for Initial Screening, Phone Interview, Behavioral Test etc. depending on your choice. But I wanted to keep it limited to major stages.

Once all this is set up, adding jobs is easy. Let’s say I had the job description open for the job I was interested in. I can start adding job by clicking on + Add a card option.
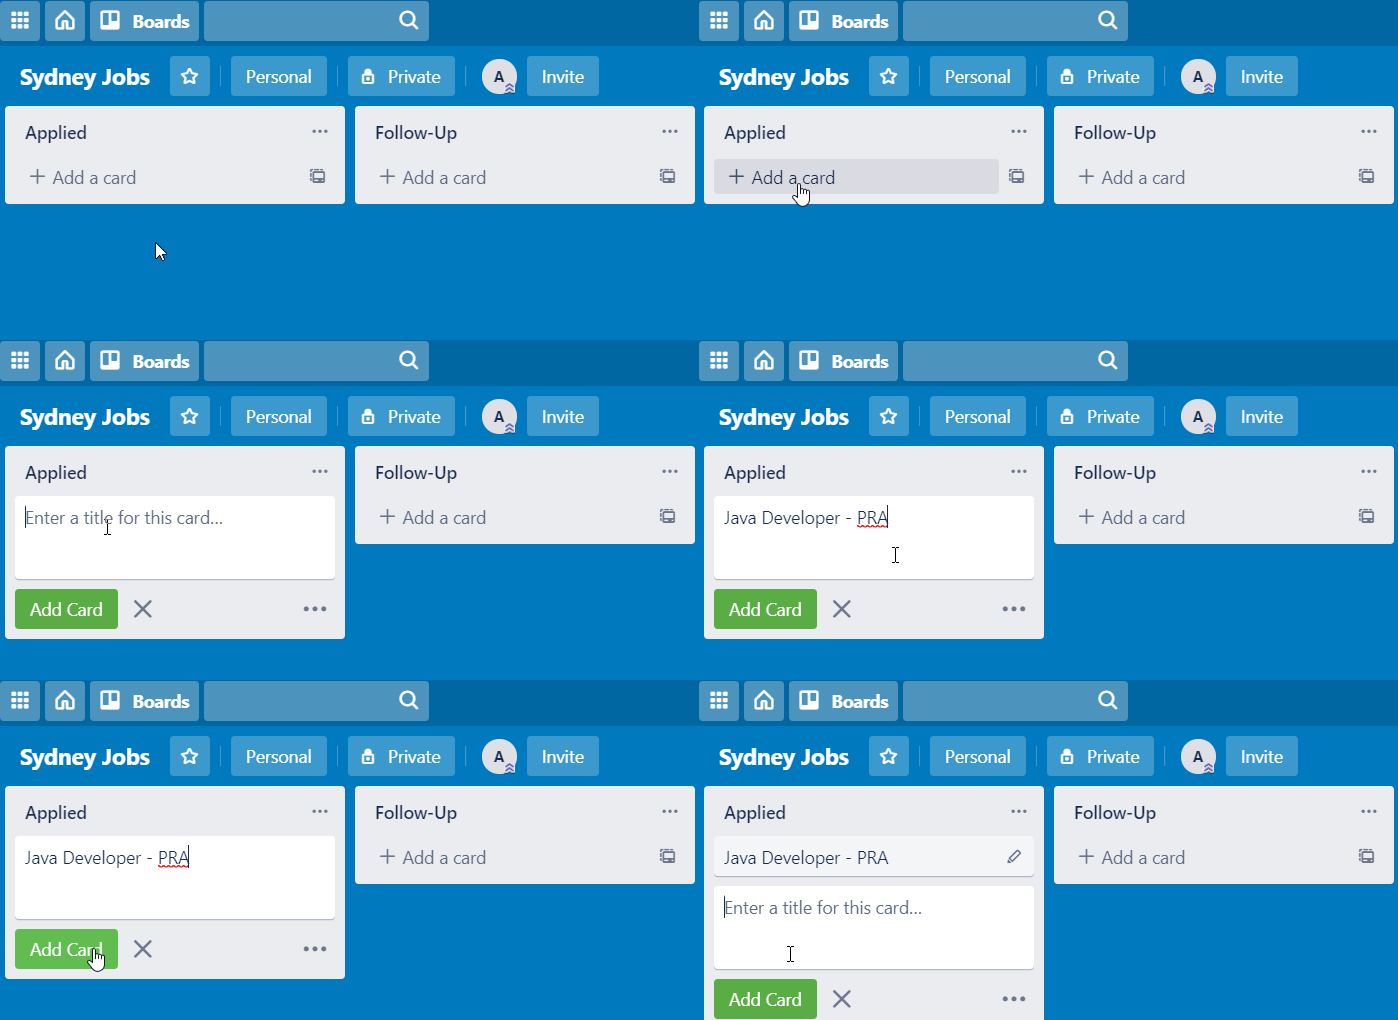
I can copy the position title along with the company name from the job portal and use it as a title and press Enter. This creates the card. Now let’s click on the card to start adding more details about the job.
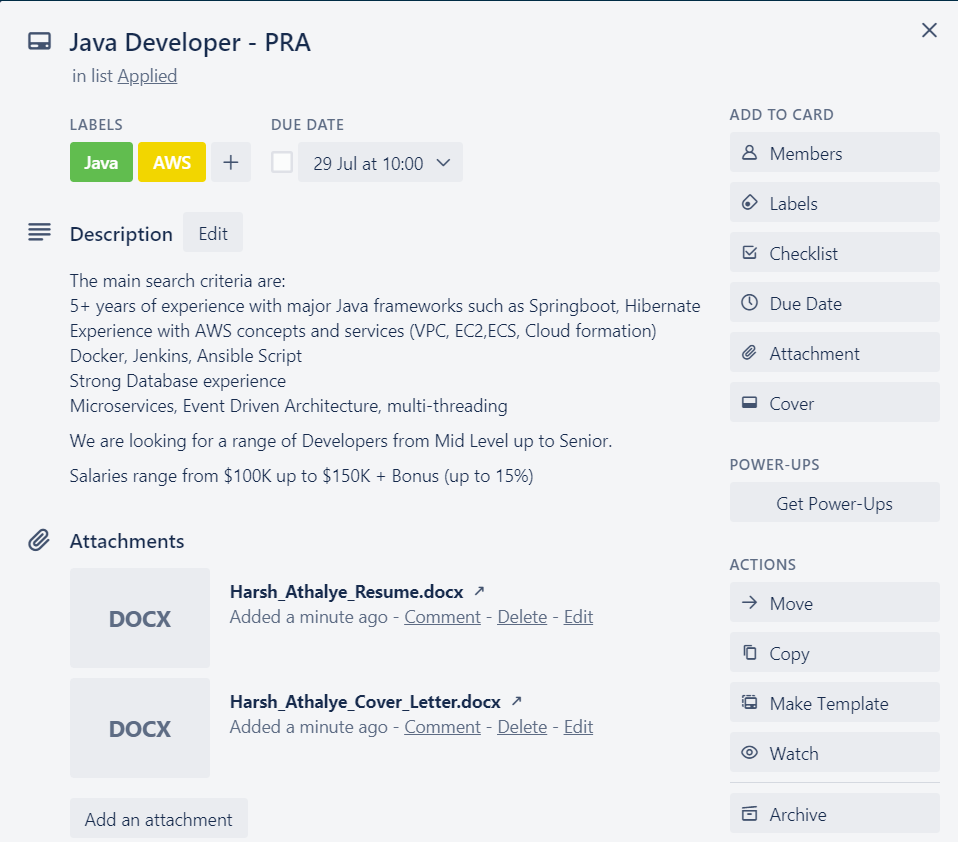
I can copy the job description from Seek and paste it in the Description box. I can also attach my customized resume and cover letter to this card.
Once a job moves from one stage to next, I can simply move it across. For example, if I have followed up on .Net developer job for {xyz company}, I can drag the job card from Applied to Follow-Up list. From here, I can either set a new due date for next follow up or move it further.

Useful Features Of Trello
Trello is loaded with plenty of useful features. Here are a select few you can use to help manage your job applications.
Due Date
For any job card, I can add a due date to remind me of doing the next task.
For example, let’s say I want to follow up on a job after a couple of days, I can set the due date for two days from today. That way I will know when each job needs a follow-up. Trello displays the due date on the board and also highlights it with orange or red depending on whether it is due soon or overdue.
You can also set up a reminder along with the due date. Please note that you need to watch the card to get the reminder. You can watch a card by clicking on the Actions > Watch on the card.
Labels
Another nice feature of Trello is Labels. A label is like a tag to categorise tasks even further.
For example, let’s say I want to quickly find all jobs which require Java skills. I can create a label called Java, give it a colour and attach it to the relevant jobs.
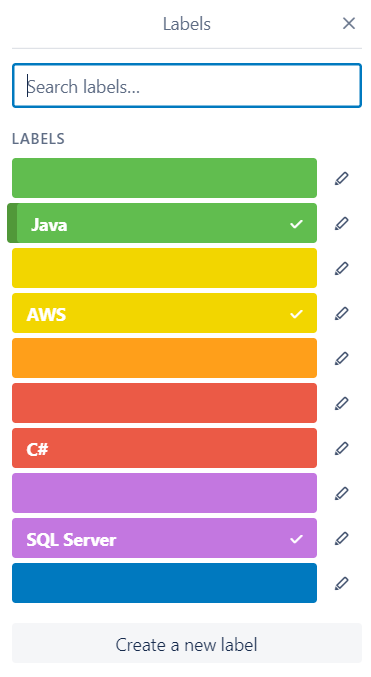
Now I can quickly find all the Java jobs just by looking at the job dashboard itself. If you don’t remember label by colour, don’t worry. You can toggle text on and off by just clicking on labels of the card from the job board. How cool is that!

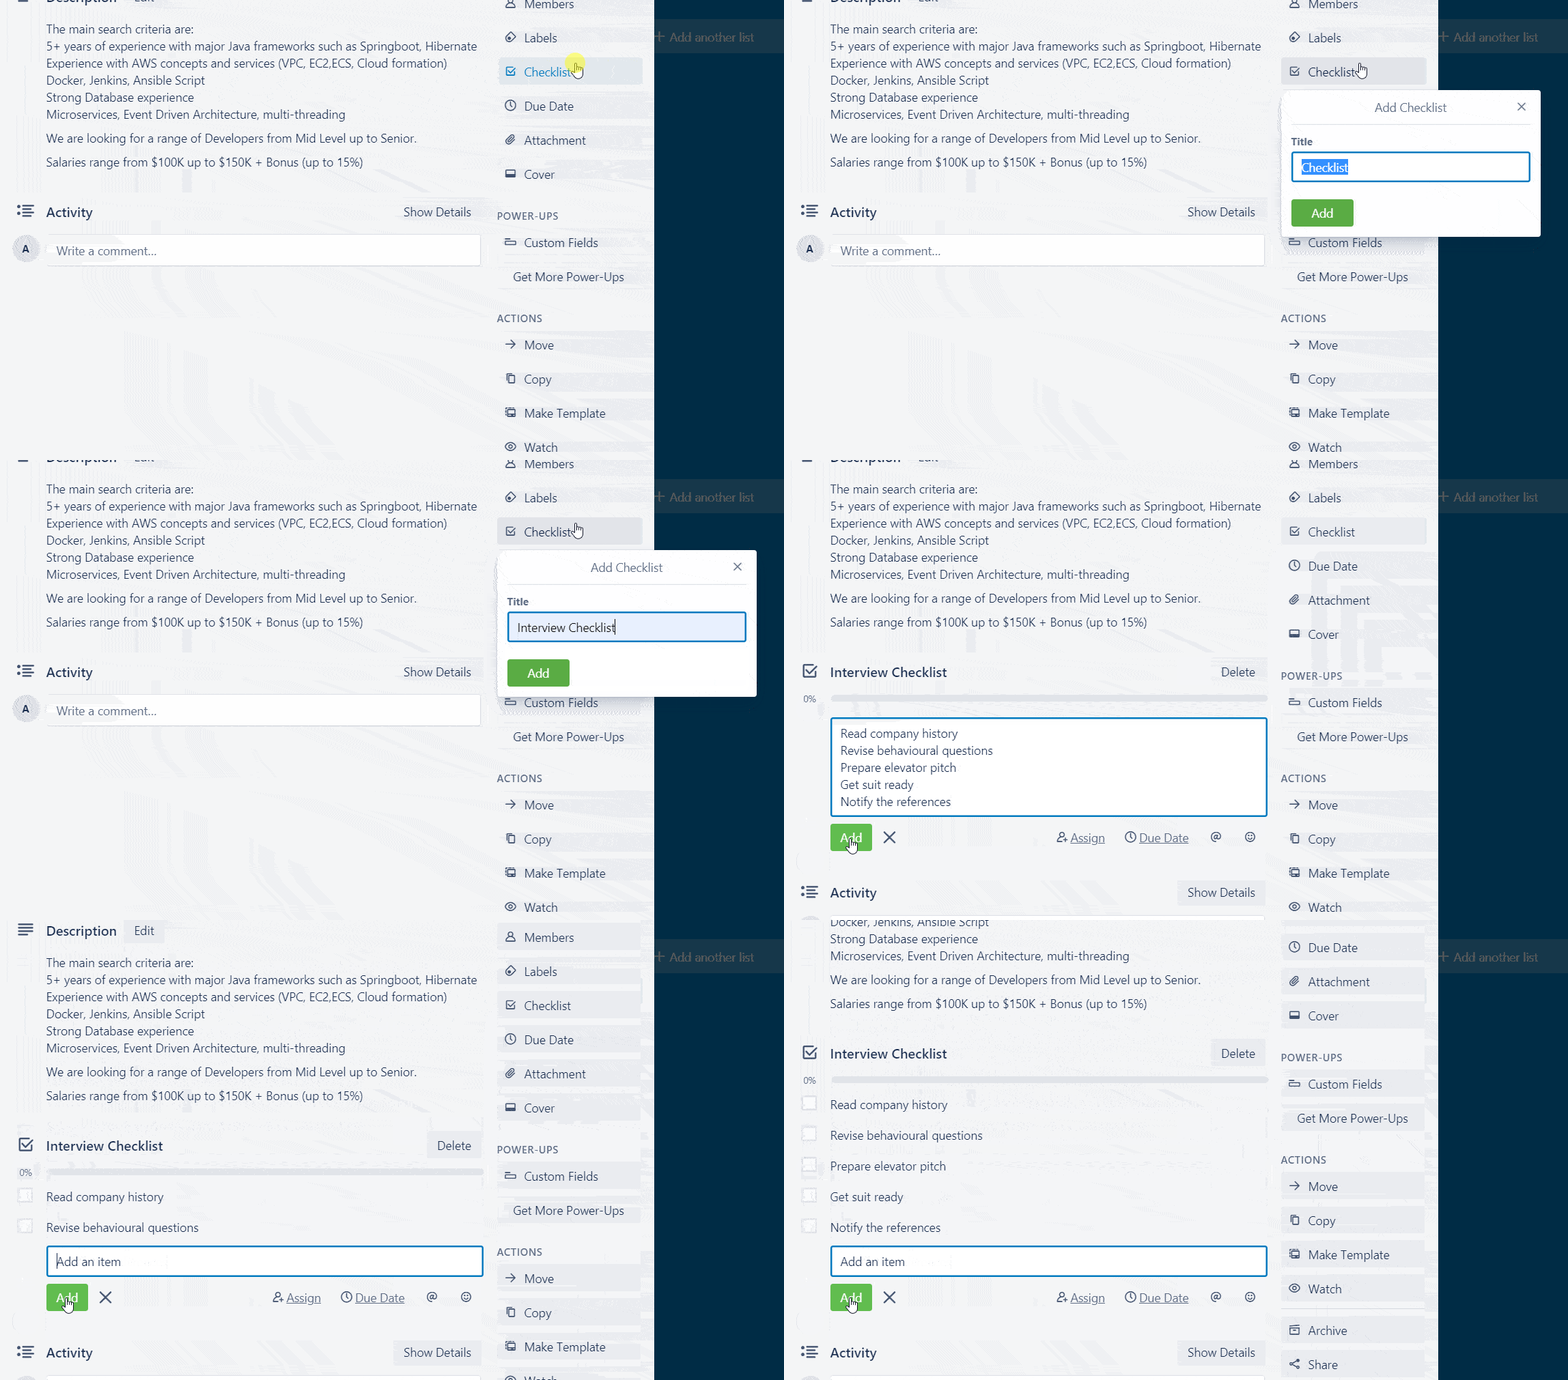
Checklist
The checklist is a highly useful feature to keep track of things you need to do before you move on to the next stage.
For example, let’s say there is a job which is in the Scheduled For Interview stage. Before the interview, I want to make sure that I had finished certain tasks such as getting suit ready for the interview, reading about company history, revising behavioural questions, preparing elevator pitch etc. I can add these tasks as a checklist. As I complete each task, I can tick them off.
Comments
Make no mistake, comments is a powerful feature of Trello. You can use comments to keep track of all the activity that happened for the job.
For example, let’s say you followed up on a job today. You might want to note it down so that you will know when to do a second follow up. With Trello, you can simply add a comment saying that you gave a call to the recruiter and he will respond back in a couple of days. Since Trello adds date and time with each comment, when you open the card next time, you will know if it needs another follow up just by looking at the comments.
Copy Board
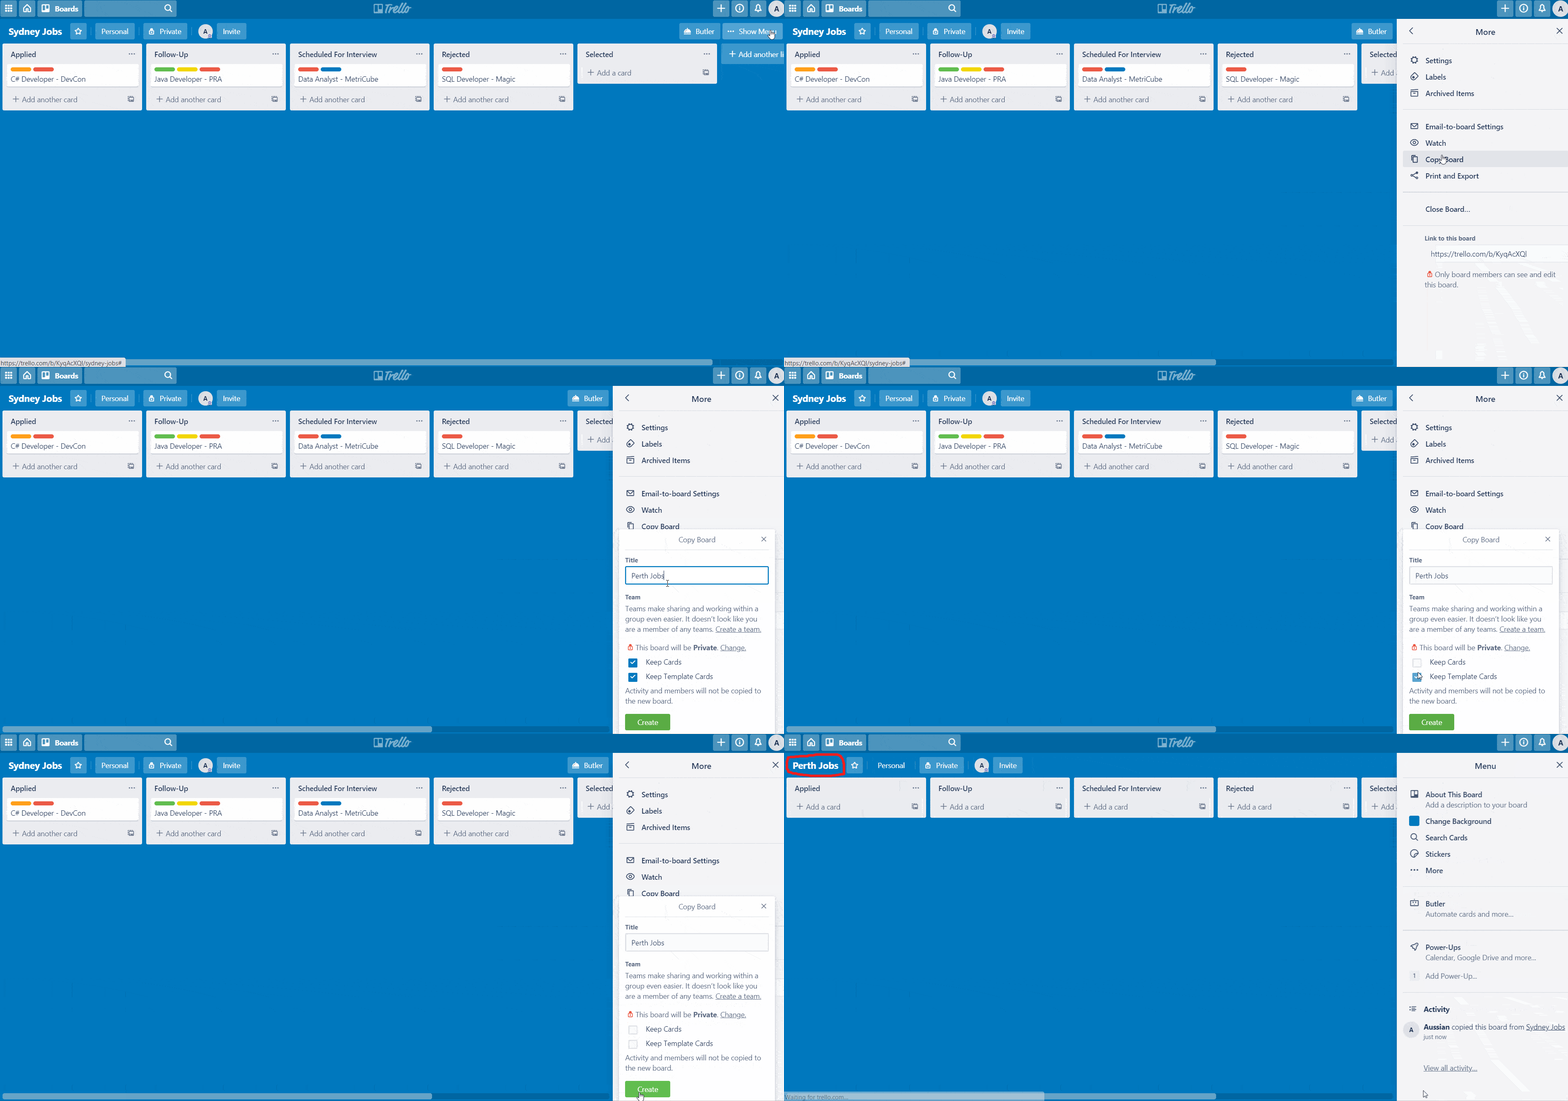
I could also use one board as a template for subsequent job boards. For example, once I have a job board ready for Melbourne, I want to create boards for other cities without going through all the steps again.
How do I do it? It’s simple. Click on …Show Menu button on the top right corner. In the menu, click on … More > Copy Board option.
In the Copy Board dialog box, you can enter the name of the new board you want to create. You can also copy the cards or you can just create an empty board with just the stages. Click on Create and Voila! The new job board is ready to rock.
Trello Power-Ups
Trello has plenty of useful addons, which are called Power-ups. You can add them to the board by clicking on Show Menu… > Power-Ups option.
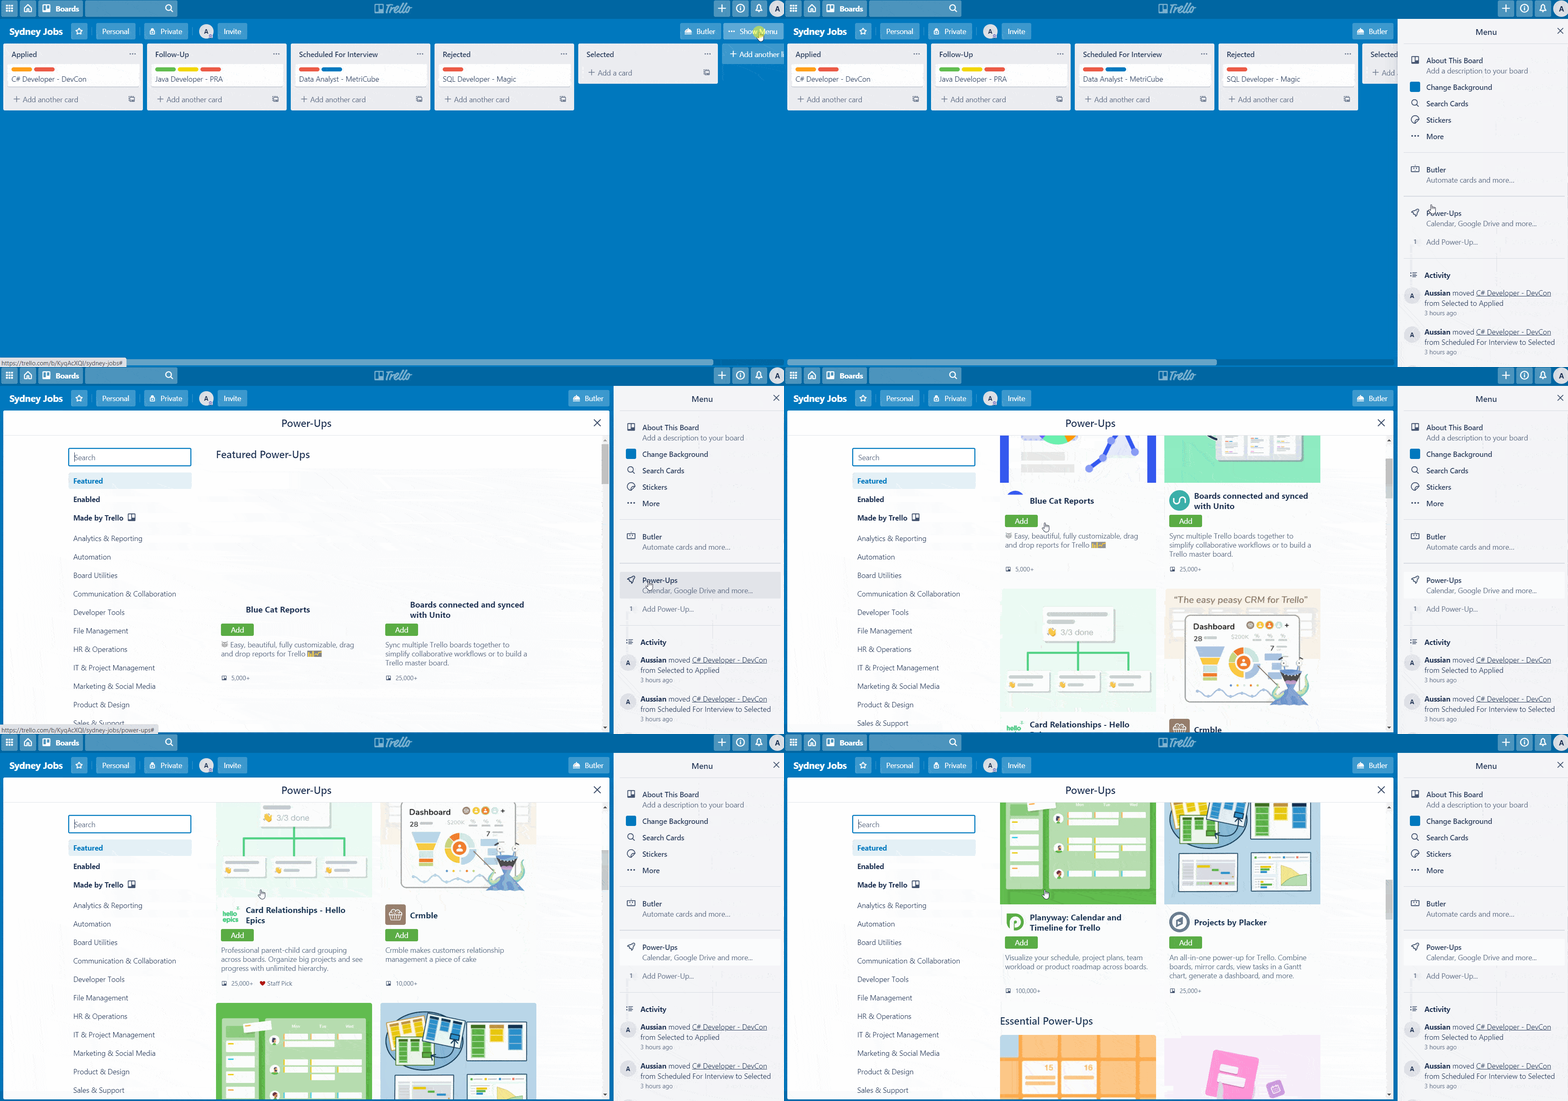
There are literally hundreds of power-ups which you can add to your board. With free account though, you are limited to using only one power-up per board. It’s still quite generous because the limit is per board and not per account which means you can use different power-ups for different boards. Here are a few power-ups which I found really useful.
Custom Fields
With custom fields power-up, you can add a checkbox, date, number, dropdown or text field to your card. For example, let say you want to categorise jobs by industry or domain. You can add a dropdown which lists all the industries and you can select the industry for each job.
Another useful example would be adding a text field to write down recruiter’s email or contact number. The great thing about custom fields is that they can show up on the front of the card. That way you can look up recruiter’s contact details from the dashboard itself.
Calendar
The calendar power-up gives a different perspective to your board. If you have added due dates to your cards, with Calendar power-up you can view your jobs as an appointment on the calendar. The calendar view makes it easy to focus on a particular day and finish all the tasks for that day.
Bulk Actions
This is one of my favourite power-ups. As the name suggests, it gives you the ability to perform an action on multiple cards at once. So let’s say you followed up on 5 jobs in a day and want to move them to Followed Up list. With Bulk Actions power-up, you can do that very quickly.
Here is a more practical example. Let’s say you have a bunch of finance jobs to which you want to add label “investment banking”. Now you can either open each card and apply a label or use Bulk Actions power-up to finish it in seconds.
Butler – The Automation Guy
You thought that was exciting? Wait till you see a feature called Butler in Trello.
Butler is kinda similar to rules in Microsoft Outlook. In Butler, you can define a condition and what action you want to take when that condition is satisfied.
For example, let’s say you want to automatically apply label C# when the job description contains that word. In that case, you can create a rule to that effect and Trello will take care of it.
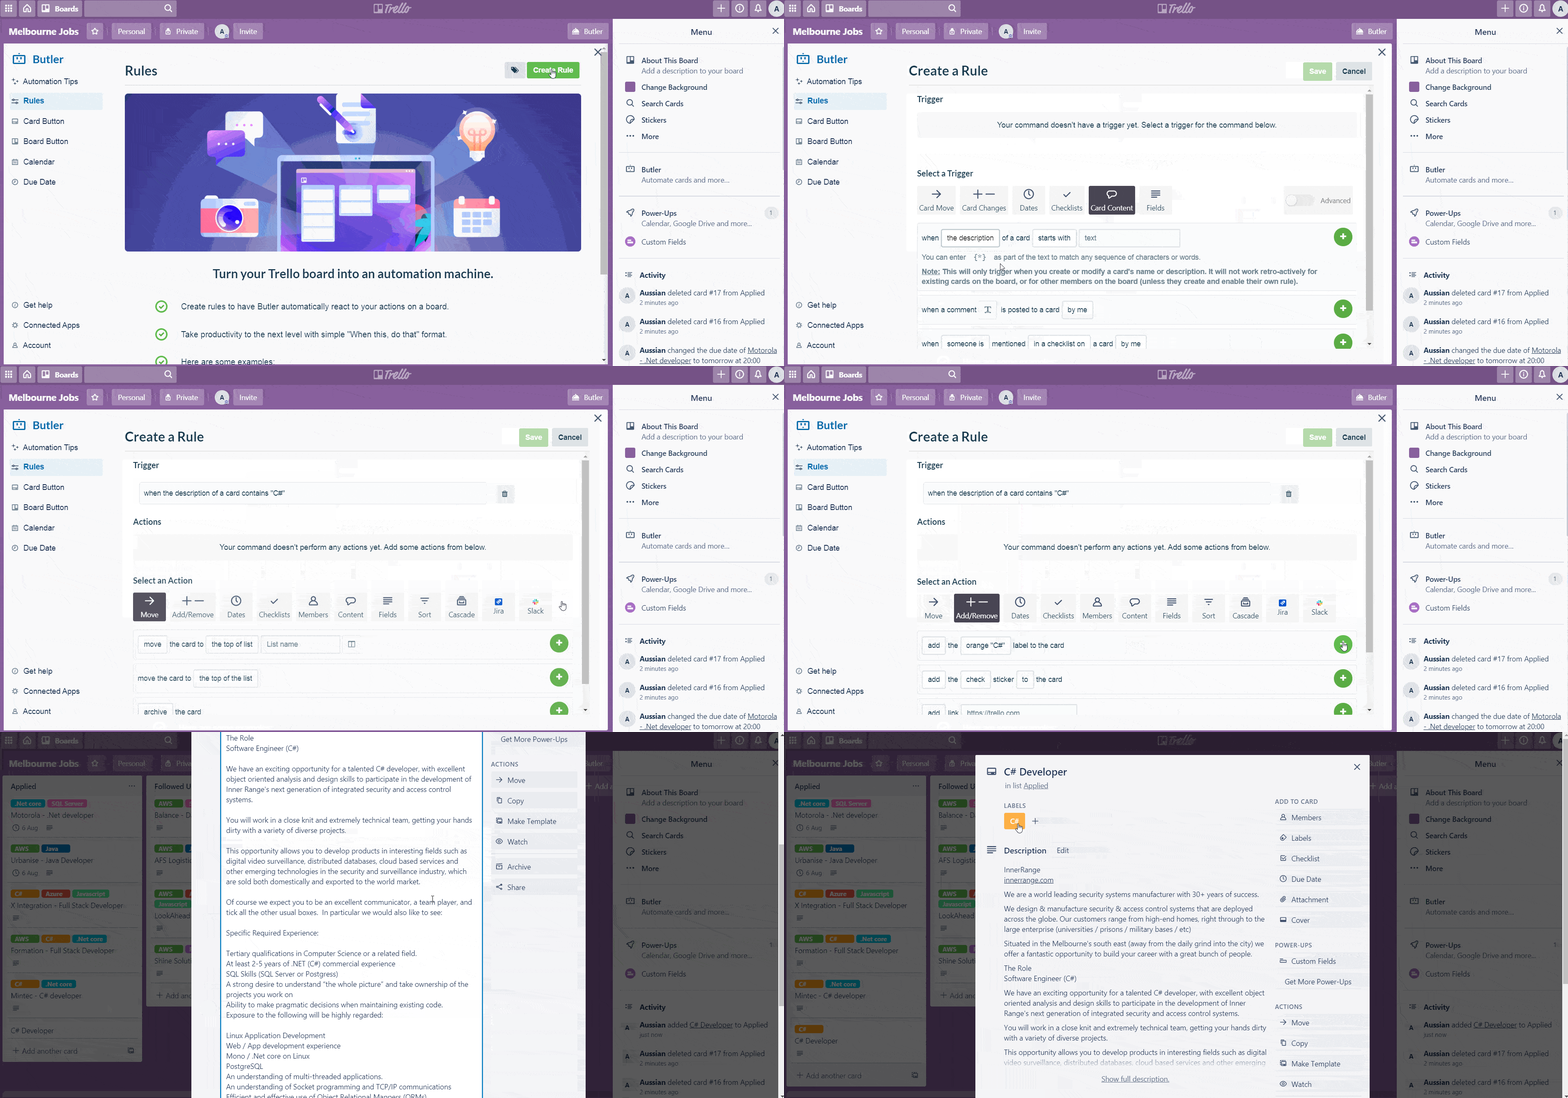
Here is another example. Let’s say you want to move all the jobs which need to be followed up within the next 2 days to the top of the Applied list and maybe add a little clock icon on top to highlight it. Here is how you can do it.
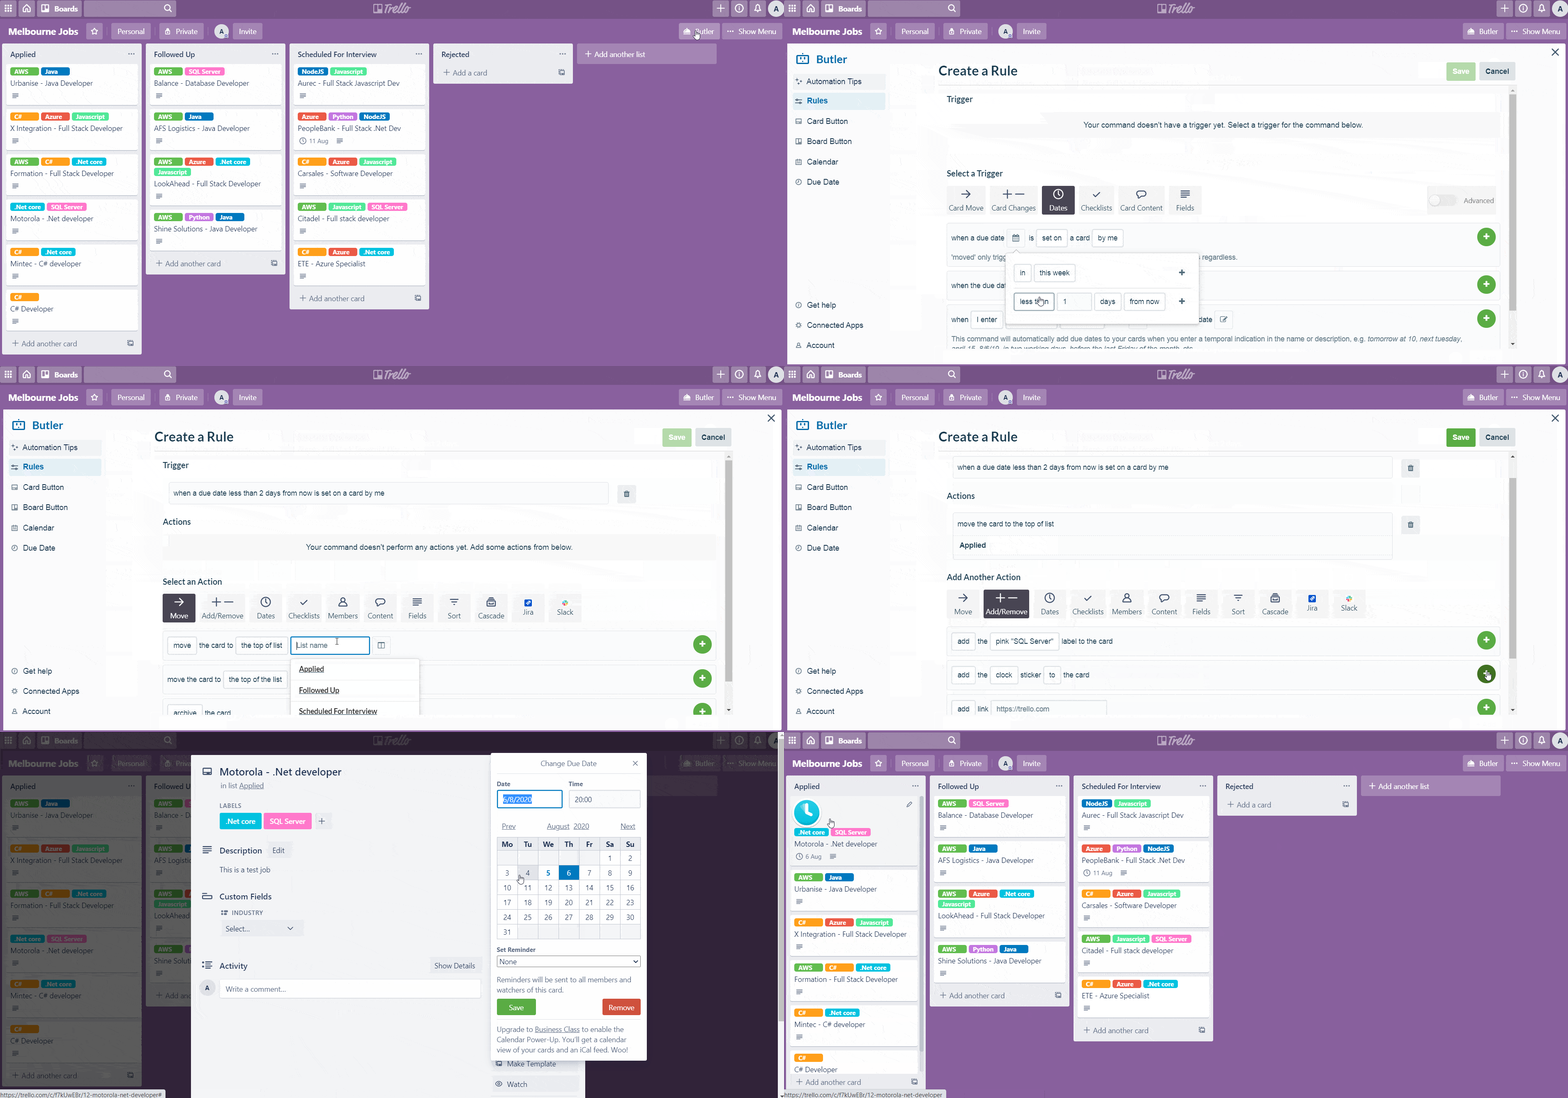
As you can see, you are only limited by your imagination. This is awesome stuff!
A note though, since this is a free account, again you are limited to creating one rule per board.
To conclude, you can see how easy it is to manage your job search with Trello. No more messing around folders and manual stuff. Just put everything in Trello and you have a sophisticated system at your fingertip. All for free. So if you are new to Australia (or not) and looking for a job, use Trello to do it like a pro. Let me know what was your experience using Trello in the comments.
 10 Facts of Australian Job Market You Might Not Know
 When Is The Best Time To Move To Australia?
 8 Easy Tips To Overcome Anxiety When You Arrive In Australia
 How Much Money Should I Bring To Australia?